DIY Galentine’s Day Party with Woodpeckers Crafts
*This post was created through a paid partnership with Woodpeckers Crafts. However, all opinions are honest and 100% my own.
*This post contains affiliate links. For more information, please see my disclosure page here.
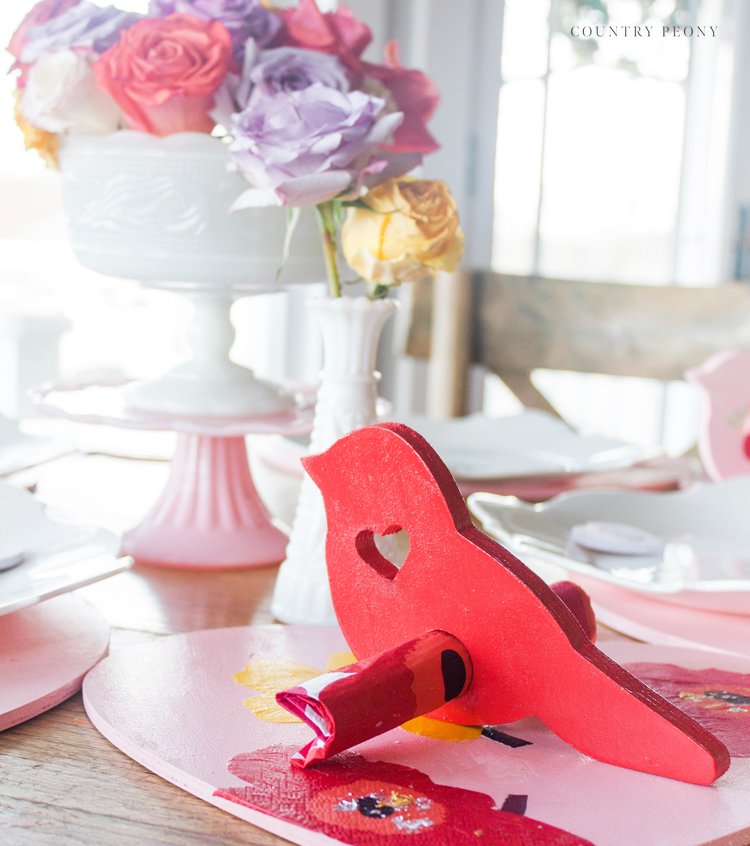
With Valentine’s Day around the corner I thought it would be so much fun to honor our friendships with a DIY Galentine’s Day Party. To inspire todays DIY party décor, I found these charming heart cutouts and Love Bird Messenger cutouts from Woodpeckers Crafts. I especially love how the Love Bird Messenger cutouts from Woodpeckers Crafts are the perfect addition to any tablescape as the cutouts make the cutest napkin holders!
But first let’s talk about the color palette. Before I start planning any event or craft project, I like to create a color palette to work off of. I like to stick with 3 to 4 colors as to not overwhelm the eye. I was inspired by charming modern floral napkins in yellow and red tones. I then added some pink and light purple tones to play up the Valentine’s season and I love how it all came together.
The beauty in todays DIY is how simple and versatile it is. All you need is some craft paint, wooden cutouts, mod podge, and beautiful napkins to create this look! It is fully customizable to whatever colors and patterns you use, and it so much fun to make. Please enjoy the steps below to create your own look for Galentine’s Day this year.
Before we get started, I wanted to highlight Woodpeckers Crafts. I am so excited to partner with Woodpeckers Crafts today because they provide very high-quality wooden products that are the perfect base for any crafting project. Their mission to use wood to fuel creativity is a wonderful one I can get behind, and I feel so grateful to partner with them on today’s project. And, if you want to try this craft project for yourself or if you want to purchase any of their products, they have graciously offered 5% off your purchase, by using the code “countrypeony”.
Continue below for the step-by-step tutorial to create your own décor for a DIY Galentine’s Day Party with Woodpeckers Crafts
To Make Your Own Galentine’s Day Party Décor, you will need
Woodpeckers Crafts’ Wood Valentine Love Bird Messenger Cutout. *Use code “countrypeony” for 5% off your purchase at Woodpeckers Crafts.
Woodpeckers Crafts’ Heart Cutouts. I used 2”, 7”, 10” and 12” Heart Cutouts. *Use code “countrypeony” for 5% off your purchase at Woodpeckers Crafts.
Woodpeckers Crafts’ 14” Circle Wooden Cutout. *Use code “countrypeony” for 5% off your purchase at Woodpeckers Crafts.
Craft Paint
Spray Paint
Foam Brush
Floral Paper Napkins
Scissors
Mod Podge
Metallic Foil Flakes
Pencil
Thin Craft Paintbrush
Paint the Wooden Cutouts
Apply one coat of craft paint to the wooden cutouts with a foam brush.
*For the larger pieces like the charger I found it helpful to add the paint directly to the wooden cutout first and then use the foam brush to paint the cutout.
Be sure to paint the sides of the wooden cutouts.
Set the wooden cutout aside to dry fully.
Then paint all of the wooden cutouts to create the tablescape.
For today’s tablescape I used:
Four 14” Circle Wooden Cutouts to act as chargers.
Four Wood Valentine Love Bird Messenger Cutouts to act as the napkin holders.
Four 2” Heart Cutouts to act as the place cards.
One 7”, 10” and 12” Heart Cutouts for added personality!
Cut Out the Patterns from the Paper Napkins
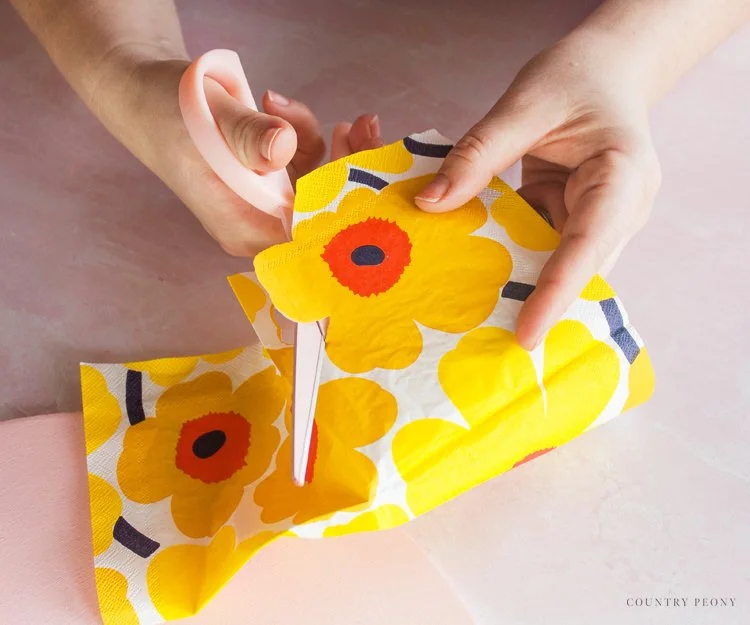
As your paint dries, cut out your favorite patterns from the paper napkins.
It is important to cut neatly and create crisp lines. Try to remove any white space from the pattern so you create a pretty silhouette.
*This is the most tedious part of the DIY, but it is worth it to take your time so you can create pretty lines and silhouettes for your tablescape.
Decoupage the Paper Napkin Pattern onto the Painted Wooden Cutouts
With your foam brush, add a thin layer of mod podge directly onto the back of the cut out napkin.
Then add the patterned napkin piece to the painted wooden cutout. Apply the mod podge to the edges of the patterned napkin and smooth out the edges onto the wooden cutout.
*Don’t oversaturate the napkin with mod podge as it may tear.
*To help keep your hands clean keep a wet towel or baby wipe and dry towel nearby. If your hands aren’t clean and dry the paper napkin will stick to you and your project will not come out as pretty as you intended.
*I also found it helpful to smooth out the edges with my fingertips. Be sure that they are clean first so that the napkin doesn’t stick to your fingers.
Repeat the process to add more flowers in a random pattern. Then let the mod podge dry.
For added whimsy, attach the floral napkin pieces to the wooden Love Bird Messenger cutouts as well. *Or, you can follow the steps below and spray paint the birds instead.
Use scissors to cut out the napkins for the holes and hearts in the Love Bird Messenger cutout.
Use your finger and mod podge to adhere the napkin to the inside of the heart cutouts and hole cutouts.
Apply One Coat of Decoupage to the Entire Wooden Cutout
Once the first layer of mod podge is dry, coat the entire wooden cutout with one thin layer of mod podge.
Add Metallic Foil Flakes to the Center of the Flowers
For added charm and sparkle, while the mod podge is still wet sprinkle some metallic foil flakes on to the centers of the flowers.
Use your finger to press the metallic foil flakes into the wooden cutout.
Let it dry completely!
Spray Paint the Love Bird Messenger Cutouts
Since the Love Bird Messenger cutouts are the star of the show, I decided to decoupage and spray paint some of them.
Spray paint two coats of a complimenting color to each side of the Love Bird Messenger cutouts so that they stand out from the rest of the tablescape.
Create the Place Cards
With a pencil, trace the first letter of your guest onto a painted 2” heart wooden cutout.
In a contrasting color and with a thin paintbrush, follow the drawn letter with paint to create a charming heart that your guests can take with them.
Set the Table for the Galentine’s Day Party
Place the chargers, heart cutouts, and Love Bird Messenger cutouts onto a blank table. Add some beautiful flowers in thrifted vases over a cake stand with some charming plates for added personality. Then use the same napkins that were the original inspiration and place them in the Love Bird Messenger cutouts, and prepare for your guests to arrive!
*The mod podge is not food safe, so I would not recommend placing food directly on it. The chargers are purely for cute decoration!
I had so much fun painting and decorating these charming wooden hearts and cutouts from Woodpeckers Crafts, and I hope you enjoy the process just as much!
I decided to style the table in two ways (with the spray painted Love Bird Messenger cutouts and one with the decoupaged Love Bird Messenger cutouts). I love how the spray painted Love Bird Messenger cutouts stand out.
Thank you to Woodpeckers Crafts for providing me with your amazing products to create this charming Galentine’s Day Tablescape. As a reminder, if you want to create your own, please use code “countrypeony” to receive 5% off at checkout at Woodpeckers Crafts.
I believe crafting is more fun when we share our projects. Please email me at elizabeth@countrypeony.com, or please tag me @thecountrypeony or #countrypeony to show me your beautiful, custom creations!
Thank you so much for following along!


