DIY Heart Fabric Yo-Yo Garland with Clover's "Quick" Yo-Yo Maker
*This post was created through a paid partnership with Clover. However, all opinions are honest and 100% my own.
*This post contains affiliate links. For more information, please see my disclosure page here.
Valentine’s Day is almost here and when I think of Valentine’s Day I think of charming decor with sweet details. I am so excited to partner with Clover today to bring you a project with those charming and sweet details for Valentine’s Day. Today I used Clover’s “Quick” Yo-Yo Maker in the Heart shape to create a sweet heart garland for Valentine’s Day! And I can’t wait to show you how to make your own.
Like most of my projects, this craft is very simple and fully customizable. You can use whatever color scheme and fabric pattern you want. This is also a great craft for all of your leftover fabric because you don’t need a lot of fabric for it.
When choosing a color palette, I do recommend picking about 3-4 colors. I always like to start with an inspiration fabric, and then pull the other colors from the inspiration fabric so the look stays cohesive. Don’t be afraid to play with pattern because it adds interest and whimsy to the final product! My inspiration fabric was the charming daisies. I then pulled the reds mustard yellow from it, and added a light pink to the mix for some fun!
Want to see more projects using Clover’s fantastic products? Click HERE.
I have used Clover’s “Quick” Yo-Yo Makers for my projects before as you can see HERE. However, this was my first time crafting with their heart-shaped yo-yo maker. And, just like their other yo-yo makers, it was so much fun and easy to use. The process is very similar to the traditional yo-yo makers. The only difference is ensuring to accentuate the top of the heart by playing with the fabric once it is sewn together to achieve the beautiful heart shape.
For your convenience, I have created a step-by-step video so you can see how I made the fabric yo-yos using Clover’s “Quick” Yo-Yo Maker in the Heart shape. Then continue below to follow the step-by-step images to make your own DIY Heart Fabric Yo-Yo Garland.
Enjoy the video below to learn how to make your own fabric heart yo-yos then follow along for the step-by-step tutorial to make your own DIY Heart Fabric Yo-Yo Garland to add some handmade charm to your Valentine’s Day decor!
Continue below for the step-by-step pictorial to make your own Heart Fabric Yo-Yo Garland!
To make your own DIY Fabric Heart Yo-Yo Garland, you will need:
Step 1: Make the Heart Fabric Yo-Yos using Clover’s “Quick” Yo-Yo Maker
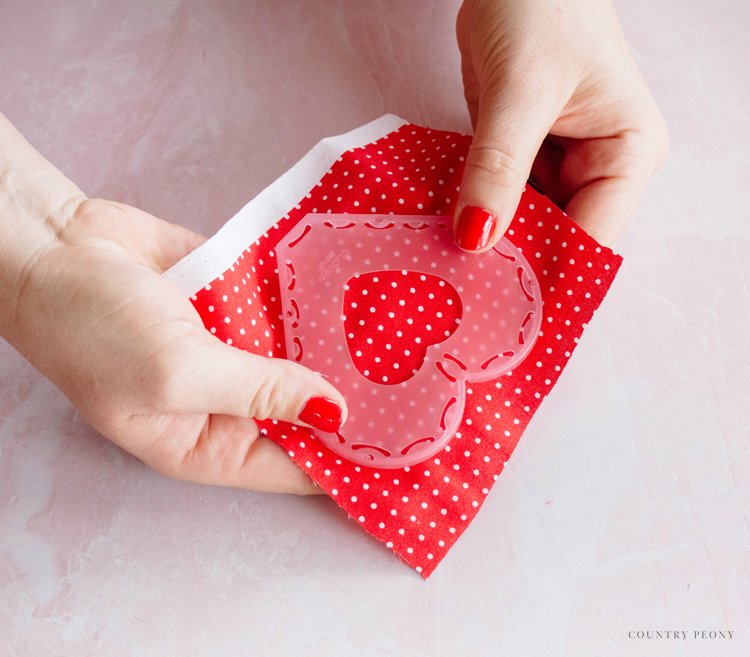
Using the “Quick” Yo-Yo Maker as a guideline, cut a fabric square that is about 1/4” wider than the maker on all sides.
Separate the “Quick” Yo-Yo Maker, and place the fabric in between the maker plate and disk.
Place the right side of the fabric peeking through the hole in the plate.
Align the disk lines with the plate marks, and snap into place.
Trim the fabric along the “Quick” Yo-Yo Maker plate line.
Cut a line where the heart meets at the top.
Prepare the needle with thread, and double knot the thread on one end.
With the fabric folded in, thread through the fabric and insert the needle through the hole from the disk side to the plate side.
Repeat until you sew all the way around the circumference of the “Quick” Yo-Yo Maker.
Once you reach the end, sew one more stitch after the first stitch.
Remove the disk from the plate then remove the fabric from the disk.
Pull the thread to create the heart shape.
Fluff up the yo-yo to create the heart shape.
Knot the thread to create a secure hold on the fabric yo-yo.
Then bring the needle through to hide the knot, and trim the thread.
Make more heart fabric yo-yos in different fabric patterns and colors.
Step 2: Attach the Heart Fabric Yo-Yos to the Ribbon to Create the Garland
Create a pattern, then use permanent fabric glue to attach the heart fabric yo-yo to the ribbon.
Continue to add the fabric heart yo-yos to the ribbon to create the garland.
Set it aside to dry!
Step 3: Display the Garland for the Sweetest Valentine’s Day Decoration
Once the garland is dry, hang it from your door, mantle, bookshelf, or wherever your heart desires and enjoy it this Valentine’s season!
Thank you so much to Clover for the opportunity to make this very sweet and charming Valentine’s Day decoration, and thank you for following along today. I hope you enjoy making your own garland just as much as I did.
I believe crafting is more fun when we share our projects. Please email me at elizabeth@countrypeony.com, or please tag me @thecountrypeony or #countrypeony to show me your beautiful, custom creations!
Thank you so much for following along!


