DIY Dollar Store Flower Mirror
I have been on the hunt for a cute, handheld bathroom mirror that matches my master bathroom style. Well, the ones that fit the description were too expensive. So I decided to make one by embellishing a very inexpensive mirror that I found at the dollar store. While at the dollar store I also found some tiny, artificial flowers that I knew would make the perfect base for my mirror. I used some spray paint and craft glue that I already had, and voila my cute mirror appeared!
I believe the end result for my two dollar mirror is so adorable. It reminds me of the vintage, enamel pins that are having a huge comback with the granny chic decorating movement.
This project is also a great reminder of the power of spray paint. As you may know from my Instagram stories, I love thrifting. Spray paint is a wonderful tool to keep in mind when you are browsing thrift stores, estate sales, or secondhand shops because a little spray paint can transform a dated, uninspired piece (as witnessed here).
I hope you enjoy this very customizable, simple, and inexpensive tutorial to turn a mirror from drab to fab for less than ten dollars.
Please continue below for the step-by-step tutorial to make your own DIY Dollar Store Flower Mirror
*Some of this post contains affiliate links, which means a commission is earned if you purchase via my link at no extra cost to you. Thank you so much for helping to support this blog. For more information, please see my disclosures here.
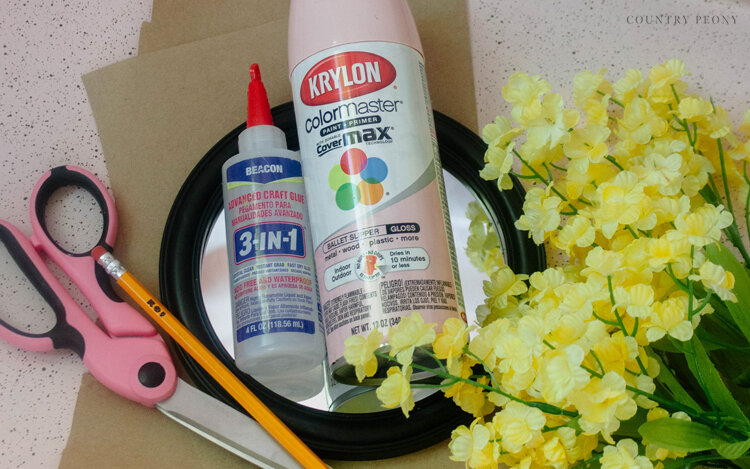
To make your own flower mirror, you will need:
Step 1: Protect the mirror face.
Measure the inside the mirror by making an indention of the mirror face with the kraft paper.
Then, use a pencil to trace the inside of the mirror face and cut it out with scissors.
Attach the kraft paper template to the mirror with painter’s tape. Ensure the entire mirror face is covered.
Step 2: Remove the flower petals from the stem one by one.
Step 3: Attach the petals to the mirror.
Add a large amount of Beacon’s Advanced 3-in-1 Craft Glue (linked above) to the back of one flower petal base, and attach it directly to the mirror.
*Don’t worry about adding too much craft glue, because it will dry clear.
The craft glue is fast-drying, but it is important to hold the petal down as the glue dries so it stays in place on the mirror. Hold the petal down for about 30 seconds as the glue dries.
Continue to add petals to the mirror one at a time. Attach the petals right next to each other (some overlapping a little to create dimension on the mirror).
Glue petals to the entire mirror frame.
Let the glue dry overnight.
Step 4: Spray paint the mirror.
Take the mirror outside (or in a well-ventilated area) and apply one thin coat of spray paint to the entire mirror frame.
I recommend applying spray paint about 6 inches away.
Once the first coat of spray paint dries, then apply another coat of spray paint.
I recommend adding about 5 coats of spray paint to the mirror. This will give it a thick (almost enamel-looking) finish.
Once you apply about 5 coats of spray paint, let it dry overnight outside. Make sure it is in a safe space outside, away from the elements.
Step 5: Gently remove the painter’s tape and kraft paper.
Step 6: Clean the mirror, and scratch off any excess glue or paint that may have leaked onto the mirror surface.
Step 7: Display and enjoy!
My daughter loves the mirror so much that it has found a new home on her shelves in my children’s newly decorated shared bedroom.
However, I may have to bring it back to my master bathroom and place it in front of the adorable egg carton flower bouquet my children made for me last week for Mother’s Day.
I hope you enjoy embellishing your own mirror with flowers!
I believe crafting is more fun when we share our projects. Please email me at elizabeth@countrypeony.com, or please tag me @thecountrypeony or #countrypeony to show me your beautiful, custom creations!
Thank you so much for following along!


