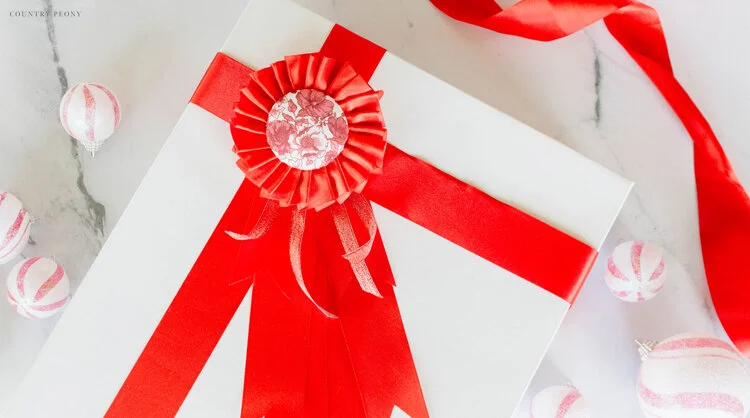
DIY Personalized Rosette Ribbon Gift Topper with Clover
*This post was created through a paid partnership with Clover. However, all opinions are honest and 100% my own.
*This post contains affiliate links. For more information, please see my disclosure page here.
Gift giving is so much more fun and special when you can personalize not only the gift, but the gift topper. I am so grateful to partner with Clover today to bring you a really special and sweet customized gift topper, just in time for Christmas: DIY Personalized Rosette Ribbon Gift Topper.
I was so excited to work with Clover’s Rosette Maker for this project, because I believe rosettes are so charming and they add a vintage inspired flair that I love. The beauty in this DIY is that the rosette gift topper is a gift in itself. You can customize the colors and pattern to fit your gift receiver. And, it can be used for more than a gift topper. Long after Christmas it can be used as a pin, as part of decoration, or as an ornament on the tree.
If you have been here for a while you may know that I love using Clover’s products. Here are some fun projects that I recently created with Clover’s amazing products: DIY Christmas Village Pom-Pom Wreath, DIY Felt Pumpkin Wreath, DIY Fabric Yo-Yo Wreath, and the DIY Pom-Pom & Tassel Bag Charm. Much like Clover’s other products, Clover’s Rosette Maker makes it so easy and fun to create consistent and pretty rosettes every time in less time. Clover’s Rosette Maker comes with all of the supplies that you need to create a pin rosette. For this project I used the large rosette maker, but Clover also makes a small rosette maker which allows for so much variety and customization.
For your convenience, I have created a step-by-step video so you can see how I made the rosettes using Clover’s rosette maker. Then continue below to follow the step-by-step picture tutorial to make your own DIY Rosette Ribbon Gift Topper just in time for Christmas.
Enjoy the video below to learn how to make your own personalized rosette ribbon, then follow along for the step-by-step tutorial to make your own DIY Personalized Rosette Ribbon Gift Topper just in time for Christmas!
Continue below for the step-by-step picture tutorial to make your own rosette ribbon gift topper.
To make your own rosette ribbon gift topper, you will need:
Step 1: Make sure all of the wings of the rosette maker are overlapped in the correct direction. The right wing should be over the left wing.
Step 2: Insert the end of the ribbon underneath the plate. Then hold ribbon place with your thumb.
Step 3: Make a fold with the ribbon and push it over the left wing, underneath the right wing.
Step 4: Continue to make folds with the ribbon clockwise until you cover the entire rosette maker.
Step 5: Insert the ribbon into the same wing that you started with.
Step 6: Trim the ribbon to the same size as a wing. Place it over the beginning of the ribbon, tucked underneath the next wing.
Step 7: Place the circle stickers at the center on both sides of the rosette.
Firmly press the circle stickets together to create a secure hold.
Step 8: Carefully and slowly remove the rosette from the maker by pushing the center of the rosette through.
Step 9: Cut a fabric square that is a 1/2 inch wider than the rosette center.
Trim the square into a circle.
Step 10: Stitch about 1/4” from the outside of the circle. Stitch all the way around the circle.
Step 11: Place the center of the rosette inside the fabric circle, then pull the thread to create a secure cover around the center.
Knot the thread to secure it. Then trim.
Step 12: Prepare the ribbon tails.
Have fun with the ribbon tails. You can add as many or as little ribbons as you like. With varying lengths and textures. I created longer ribbon tails for my gift toppers because I wanted them to flow against the side of the present.
Step 13: Attach the ribbon tails to the back of the rosette with craft glue.
Step 14: Insert the pin through the felt circle.
Step 15: Glue the felt circle with the pin to the back of the rosette ribbon (covering the ribbon tails).
Step 16: Attach the fabric center to the front of the rosette ribbon with craft glue.
Step 17: Enjoy your custom, personalized rosette ribbon.
Step 18: Attach the rosette to a present with strong tape, and enjoy gifting them to your favorite people this holiday season.
I want to thank Clover for helping me to create this sweet gift topper today with their amazing rosette maker.
I hope you enjoy making your own personalized rosette ribbon gift topper.
I believe crafting is more fun when we share our projects. Please email me at elizabeth@countrypeony.com, or please tag me @thecountrypeony or #countrypeony to show me your beautiful, custom creations!
Thank you so much for following along!


