DIY Fabric Yo-Yo Earrings with Clover's "Quick" Yo-Yo Maker
*This post was created through a paid partnership with Clover. However, all opinions are honest and 100% my own.
*This post contains affiliate links. For more information, please see my disclosure page here.
It is so much fun to create custom projects that fit your style and taste. I especially love to create fun DIYs for my home, and for my wardrobe. Today I want to show you a very simple and custom DIY earring that is also a great beginner project. I was lucky to partner with Clover to bring you a DIY Fabric Yo-Yo Earring using Clover’s wonderful “Quick” Yo-Yo Maker. These earrings are the sweetest complement to your wardrobe, and they would make a wonderful, custom gift. Let me show you how to make them!
Want to see more projects using Clover’s amazing products? Then click HERE.
This is the second time that I used Clover’s “Quick” Yo-Yo Maker, and just like their pom-pom makers and tassel makers it is so easy and fun to use. For my first Fabric Yo-Yo project, I created a Fabric Yo-Yo Wreath. You can see that DIY wreath HERE. The beauty in making yo-yos is that you can use up scrap fabric, and they can be used in many different applications. When sewn together they can make a charming quilt, or they can be added to different projects to create a sweet factor.
For your convenience, I created a step-by-step video so you can see how I made the fabric yo-yo earrings using Clover’s “Quick” Yo-Yo Maker. Then continue below to follow the step-by-step images to make your own DIY Fabric Yo-Yo Earrings.
Enjoy the video below to learn how to make your own fabric yo-yo earrings with Clover’s “Quick” Yo-Yo Maker, then follow along for the step-by-step tutorial to make your own!
Follow Below for the Step-By-Step Picture Tutorial
To make your own DIY Fabric Yo-Yo Earrings, you will need:
Step 1: Make the Fabric Yo-Yos using Clover’s “Quick” Yo-Yo Maker in Size Extra Small
Using the “Quick” Yo-Yo Maker as a guideline, cut a fabric square that is a 1/4” wider than the Maker on all sides.
Separate the “Quick” Yo-Yo Maker, and place the fabric in between the Maker plate and disk.
Place the right side of the fabric peeking through the hole in the plate.
Align the disk lines with the plate marks, and snap into place.
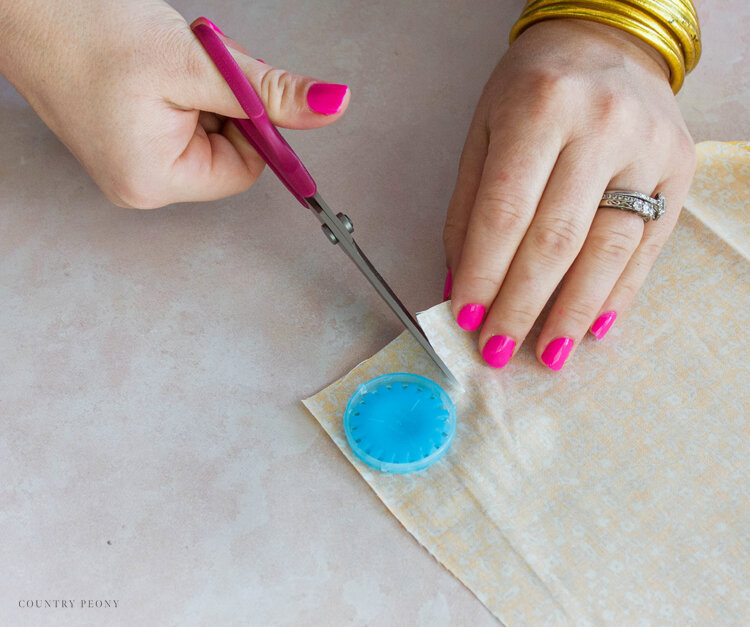
Trim the fabric along the “Quick” Yo-Yo Maker plate line.
With the fabric folded in, thread through the fabric and insert the needle through the hole from the disk side to the plate side.
Repeat until you sew all the way around the circumference of the “Quick” Yo-Yo Maker.
Once you reach the end, sew one more stitch after the first stitch.
Remove the disk from the plate.
Remove the fabric from the disk.
Pull the thread to create the circular shape.
Fluff up the yo-yo to create the round shape.
Step 2: Add the Button to the Fabric Yo-Yo.
Thread through the back of the button, and then through the back of the Fabric Yo-Yo.
Secure the button and the Fabric Yo-Yo with a knot.
Trim as close to the Fabric Yo-Yo as possible.
Step 3: Attach the Earring Stud to the Fabric Yo-Yo.
Attach the earring stud to the back of the Fabric Yo-Yo with permanent fabric glue.
Hold in place to secure the earring stud. Then let it dry completely!
Special Tip: Create Multi-Layered Earrings with Clover’s Different Size “Quick” Yo-Yo Makers!
Use Clover’s “Quick” Yo-Yo Maker in size small to create multi-layered earrings.
Have fun with the different colors and patterns!
Step 4: Enjoy Your Custom, Fabric Yo-Yo Earrings!
I love how sweet and charming these earrings came out. They would make the perfect gift, or be the perfect accessory to any outfit. I hope you enjoy making your own!
Thank you so much to Clover for the opportunity to make these very sweet and charming earrings.
I believe crafting is more fun when we share our projects. Please email me at elizabeth@countrypeony.com, or please tag me @thecountrypeony or #countrypeony to show me your beautiful, custom creations!
Thank you so much for following along!


